Slicing through the snow on your sled is a fun and thrilling winter pastime. Many of us don’t pay much attention to small logistic details when purchasing a new snowmobile. Loading and unloading your machine is one such important detail that we seem to forget once we take possession of this phenomenal machine.
We believe that the enjoyable experience of riding a snowmobile shouldn’t be negated by the hassle of transporting it to find new trails or hauling it during warmer seasons. Snowmobile ramp plans can help in getting your vehicle safely and quickly in a truck or pick up.
While there are many ramps available in the market, constructing your own snowmobile ramp plan, which is adapted, well structured, and fits your sled, can really simplify the transport of your snowmobile. And not to mention it is much more reasonable and is easy to build too.
Below we will discuss how you can make your DIY snowmobile ramp plan and the things you will require in its making.
Let us load up and begin cruising!
Table of Contents
How To Construct A Snowmobile Ramp Plan
If you live near snow, you are lucky. Otherwise, snowmobile ramp plans can facilitate efficient and simple loading and unloading of your ride. After all, there is nothing better than to get in your vehicle as quickly as possible after a freezing day.
Here’s a non-exhaustive list of the items that you will require in constructing a DIY snowmobile ramp plan:
- Circular saw
- Wood screw
- Drill
- Nuts, screws, and lag bolts
- 2 big washers
- 4, 1 inch PVC pipes
- 3, 2×8 inches boards
- Ultra-Tow aluminum ramp kit
For The Snowmobile
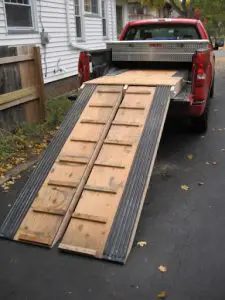
The heavy-duty aluminum ramp by Northern Tool is the highlight in constructing a superb snowmobile ramp plan. It can convert an 8-foot wood plank into an instant loading ramp for your snowmobile in no time. Start with mounting the ramp plates and two PVC pipes on the boards. Keep the long way of the PVC pipes centered, leaving a gap according to your snowmobile design in the middle for the wear bar. For creating a gap, drill the holes along the length of the PVC pipe and then double drill the same holes so that they become big enough to accommodate the head of the screw, which should nearly be halfway through the PVC pipe. By doing this, you will get an inexpensive and quick set of ramps for your sled that won’t dig into the carbides.
For The Track
Start with predrilling the boards first, then put the screws and lag bolts into each side of the board, nearly two inches from the end, which will come on the side of the end gate of the truck, along with the washer on them, leaving them for about 0.5 inches from all the way in. Pro tip: Drop a tie-down strap for all the sides of the track ramp between the bed and the end gate and hook it with the safety chain hookups present on the truck hitch. Next, take the other ends and hook their hooks around the lag bolt between the washer and the boards. By doing this, the board will never force out while you drive your snowmobile up the ramp plan.
Overall, constructing a snowmobile ramp plan will require only some hours in your garage or basement. However, they save you a lot of trouble during the cold weather. All that is needed on your part is just to let your creativity and imagination run wild in building the ramp plan that is going to accommodate you for many years.
Leave a Reply